June 10th, 2021
Venthyr Arms Warrior DPS & Cooldowns Guide – Shadowlands 9.0.5
Before we get into how to configure your talents and builds, let’s talk about the baseline abilities for Arms warriors and how they interact with one another.
Arms Passive Abilities
These are not abilities you’ll place onto your action bar, but are extremely important to be aware of while learning Arms as a whole. These three passive abilities indirectly allow us to do most of our damage, making them pivotal to our performance.
Mastery: Deep Wounds
The most important ability to be aware of is Arm’s “Mastery” ability, called Deep Wounds. Deep Wounds is a bleed which gets applied to our target by certain abilities and lasts 12 seconds. This bleed does an OK amount of damage itself, but the main reason we apply Deep Wounds is that it amplifies all other damage the target takes from us, scaling with the amount of mastery you have. You want Deep Wounds to be applied on your main targets at all times. Deep Wounds is the most important tool in your kit, keep on our target at all times, refreshing it once every 12 seconds.
If you have 22% mastery, Deep Wounds amplifies all damage done to the target by 22% (ie: if Deep Wounds is missing, you’re doing 22% less damage!)
Deep Wounds gets applied by the following abilities:
- Mortal Strike
- Warbreaker/Colossus Smash
- Ravager/Bladestorm
- Cleave (a talent we don’t take)
Seasoned Soldier
The second passive to be aware of is Seasoned Soldier which makes our Critical Strike auto-attacks generate 30% additional rage. Arms will primarily generate Rage through our auto-attacks, so getting additional rage every time we get a critical strike is a major factor in our rage generation. Because of this, Critical Strike is our most important stat to focus on since it means more rage generation, resulting in more damage done.
Tactician
The final passive, Tactician, is a subtle one, but very important to look out for. Tactician makes it so that we have a 1.4% chance per-rage spent to reset the cooldown of Overpower, one of our only free DPS abilities. Since Overpower does not cost rage, we’ll want to always focus on using Overpower to keep it on cooldown, so that when we spend rage we have a decent chance of instantly resetting Overpower– allowing it to be used again. If we don’t use Overpower often, this passive becomes useless since the Tactician reset would have no effect, equating to a dps loss.
Arms Active Abilities
Arms has a fair number of abilities and we won’t be getting into all of them in this guide. Instead, we’ll be focusing on the damaging abilities of the class to keep things simple. If you’re interested in learning how to better use your defensive abilities, as well as general warrior utility spells, I’ll have a separate guide which covers that topic which you can check out. That said, let’s talk about how to do some damage.
I find it easiest to think about Arms DPS in three major categories:
- DPS Cooldowns
- Rage Builders
- Rage Spenders
DPS Cooldowns
- Avatar is your “Major DPS Cooldown” and should be used whenever available. This is a talent and the best choice in its row. It increases all damage you deal by 20% for the next 20 seconds (bonus: it also removes roots/snares).
- Colossus Smash/Warbreaker is the same ability, swapped back and forth depending on if you take a talent or not. For all content in all situations: take Warbreaker (a talent, more on that later) and use it on cooldown. This ability strikes all nearby targets for a large amount of upfront damage while increasing the damage you do to them by 30% for 10 seconds.
- Bladestorm/Ravager is the same ability, swapped back and forth depending on talent choice. Take Ravager (talent) for 1-2 target fights, while taking Bladestorm (default) for long 3+ target fights.
- Sweeping Strikes duplicates 75% of all your damage onto a second nearby target for the next 12 seconds. Any time you have more than 1 target within range, be sure to use Sweeping Strikes and continue damaging your main target using your single target rotation, your multi-target damage will be done passively.
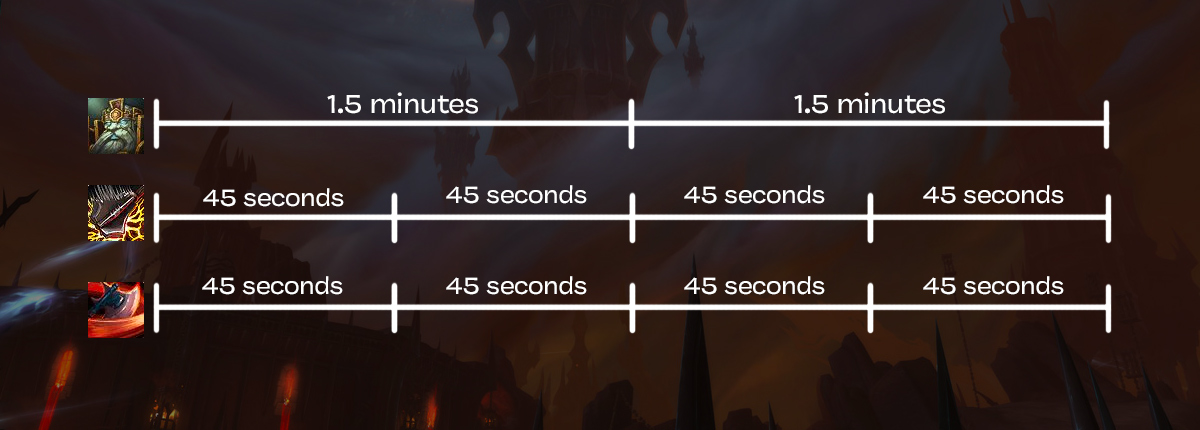
Cooldown Alignment:
These DPS Cooldowns have very nice timers in that they all line up with each other frequently, and should be used together in order to amplify their power. For example, Avatar has a 1.5min cooldown. Your two other major DPS abilities, Warbreaker and Ravager, have 45 second cooldowns (which is 50% of Avatar‘s cooldown). This means that you’ll open with all three together, Avatar, Warbreaker, and Ravager, then after 45 seconds, you’ll use the two minor cooldowns (Warbreaker and Ravager), 45 seconds go by again, and all three will be usable together again (Avatar, Warbreaker, and Ravager). There will be some situations in which your timing gets off slightly, but generally speaking you’ll use all 3 cooldowns, then 2, then all 3, then 2, repeating.
⚠️ Important Note: While it’s essential to use your cooldowns frequently, there will be circumstances where you will hold your cooldowns briefly to align better with the fight. Examples of this would be if there is an upcoming add pack spawning soon, or if you’re going into a boss within the next 2 packs.
Rage Builders
These are the abilities we’ll be using to generate our Rage, which then gets used on our heaviest hitting abilities. Your sources of rage are:
- Auto-attacks generate ~25 rage for normal hits or 33 rage for critical hits (this is why we stack critical strike on our gear).
- Skullsplitter (talent) gives 20 rage, making for on-demand rage generation.
- Charge grants 20 rage. It is used on pull, or when you get too far away from the boss in order to get back on your target with the added benefit of giving you rage. There are some advanced techniques where you can weave your Charge in between auto-attacks, which you can learn more about in my advanced tips and tricks guide.
A neat thing is that your major DPS cooldowns we just spoke about, Avatar/Ravager, all generate rage for you as well.
- Avatar: 20 Rage
- Ravager: 7 rage per pulse of damage done
Rage Spenders
After getting enough rage, you’ll then dump them into one of the following damage abilities:
- Condemn is your biggest damage dealer, but it is only available to you during an “execute window”, which is whenever the target is above 80% HP, or below 35% HP.
- Mortal Strike is the primary damage dealer outside of your execute windows.
- Overpower doesn’t actually cost Rage, but we’ll be treating it like a spender, heavily prioritizing its usage in our rotation.
- Slam is your “filler spell” that you’ll cast when you’re not in an execute window, Mortal Strike is on cooldown, and you’re about to fill on rage. Never use this during an execute window.
- Whirlwind can be safely removed from your bars. Even with maximum targets to empower your whirlwind it sadly doesn’t deal enough damage to ever warrant usage.
To put it all together, you’ll essentially be doing the following: “Use your major cooldowns, build rage, then spend range, all while maintaining Deep Wounds throughout.”
Continued learning:
Head over to the Builds and Talents guide to configure your warrior for the type of content you’re wanting to participate in.